Fix your template images that you have uploaded using Postimage
Kate Wells
 |
IMPORTANT – This user tip relates to an older version of Genovo. Although much of the content and many of the concepts still apply to the current version of Genovo, the screenshots and some instructions may no longer be accurate. |
In this month’s user tip blog I wanted to bring to your attention that one of the image web hosting services we mention in a number of our Genovo resources, postimage.org, has changed the domain name where images are stored from .org to .cc. This means that any existing images that you have previously uploaded to postimage will no longer pull through into your reports when you download them to Word. They will instead be replaced by a big red X as shown below.

There are various places within the Genovo app where you may have added an image including:
1. The Snippet Editor – The snippet editor is located within the Report Content Manager and allows you to edit the boilerplate text of your report.
2. Know Your Client Info – This can be found within the Client Objectives step of the Introduction section and it’s here that you can add personalised text regarding the client’s objectives.
3. Provider Description – This is a text box within the Provider Library where you can add a description of a particular provider.
4. Further Investment Info – This is a text box in the Investment Library where you can add further information regarding a particular investment. You may have added an image of an asset allocation pie chart here for example.
5. ATR Profile Description – This is a field in the Attitude to Risk Profiles Library where you can add a description of a particular ATR profile.
How to change the domain address
To resolve this issue just follow these simple instructions.
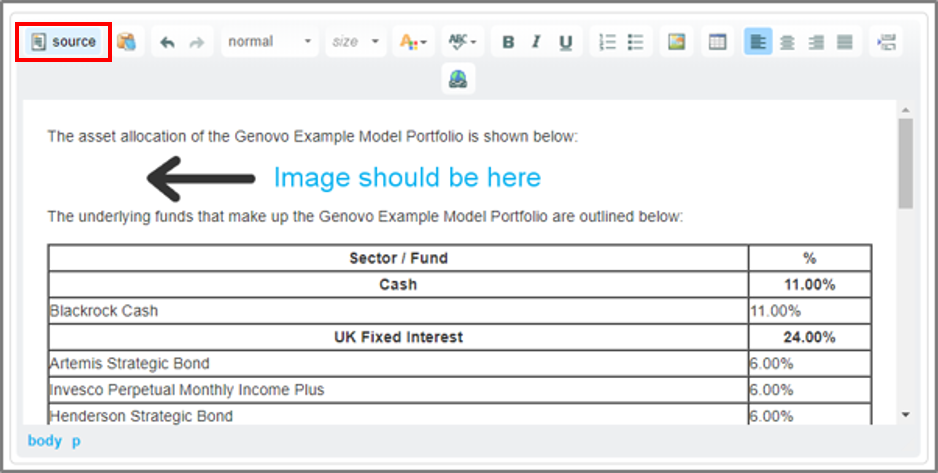
1. Click on the source button of the HTML editor window as shown in the screenshot below.
This will display the hidden HTML text and show the link to Postimage as highlighted below.
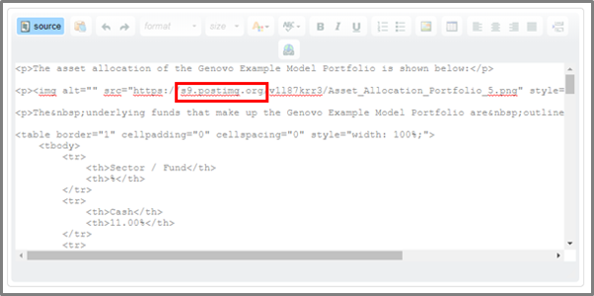
2. Locate the section of the Postimage web address that shows .org and change it to say .cc as shown below.

3. Remember to click save and you will now see your image displayed correctly.
4. Repeat this process wherever your images aren’t being displayed properly.
Please note that you will only need to use these instructions for images that you have previously uploaded using Postimage. You will not need to do this for future images.
Further Reading
You’ll find lots of useful information about how to customise your reports in our Knowledge Base or by clicking on the links below.
How do I add an image to my report template
How do I add an image to my attitude to risk profiles
Make sure you don’t miss any of our hints & tips – subscribe and get email alerts when we update our blog.
